Getting a stuck oil dipstick tube out of an engine is a common headache for mechanics, especially on older vehicles. Years of heat, oil buildup, rust, and an old, hardened O-ring can lock the dipstick tube firmly in place. What should be a simple job can become a frustrating struggle—unless you know the right approach.
This guide walks you through how to remove a stuck oil dipstick tube without breaking it, damaging the engine, or turning a quick fix into a bigger repair. The steps are written in plain, practical language—just like a seasoned mechanic would explain in person. Whether you’re swapping an engine, fixing an oil leak, or just replacing a worn-out tube, following these tips will save you time and headaches.
Common Reasons an Oil Dipstick Tube Gets Stuck
Oil dipstick tubes rarely get stuck overnight. It happens after years of engine heat, moisture, and neglect. Rust is the usual culprit, especially on cars driven in snowy, salty conditions, eventually locking the tube in place.
A hardened or swollen O-ring, baked by heat and sticking to the engine block, oil sludge, or slight tube bends from previous repairs can all jam the tube. Understanding these causes helps you choose the best removal method.
Tools & Supplies You’ll Need
Before you start, gather all your tools. Being prepared prevents rushed mistakes that can crack the tube or damage the engine. Luckily, most of what you need is probably already in your garage or toolbox.
Use penetrating oil—PB Blaster or Kroil works better than WD-40 for rust. You’ll need locking pliers or vise grips for twisting, and a rubber mallet for gentle taps. For stubborn tubes, a heat gun may help. Have rags, brake cleaner, and safety gear ready—metal bits and hot parts can be hazards.
Safety Precautions Before You Start
Don’t rush. Always ensure the engine is cool before starting. A hot engine can burn you and makes penetrating oil less effective. For safety, disconnect the battery to avoid accidental shorts.
Clear the area around the dipstick tube. Watch for hot exhaust, wires, and fuel lines before placing your hands or tools. Put on gloves and eye protection. If using heat, keep a fire extinguisher nearby. Never use penetrating oil near open flames. Take a few minutes to set up your workspace for safety.
Step-by-Step Removal – Initial Preparation
Check that nothing holds the dipstick tube in place. Find the securing bolt or bracket and remove it completely. Don’t skip this, or you’ll likely damage the tube.
After removing the bracket, clean the tube base with brake cleaner and a rag. This helps the penetrating oil work. Apply oil where the tube enters the engine and let it soak. Be patient—letting the oil work makes removal easier and safer.
Applying Penetrating Oil the Right Way
Aim penetrating oil directly where the dipstick tube meets the engine block. Spray a solid, wet coat to fully soak the joint. Don’t use a light mist—ensure the oil completely covers the area so it seeps into the corrosion.
Let the penetrating oil soak for 15 to 30 minutes or longer if needed. Avoid touching the tube during this time. Reapply oil if the area dries out. Wait for proper soaking to reduce the risk of breakage.
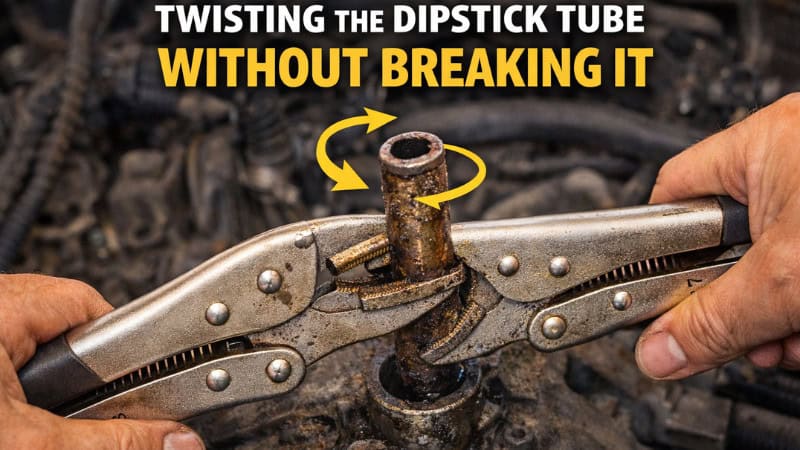
Twisting the Dipstick Tube Without Breaking It
Clamp vise grips as close to the engine as you can, near the tube’s base. Hold firmly without crushing the metal. Twist gently—do not pull yet.
Twist slowly and gently from side to side, without pulling. If the tube doesn’t move, add more oil and try again later. Even slight movement helps oil seep further, making later twists easier. Patience prevents breakage.
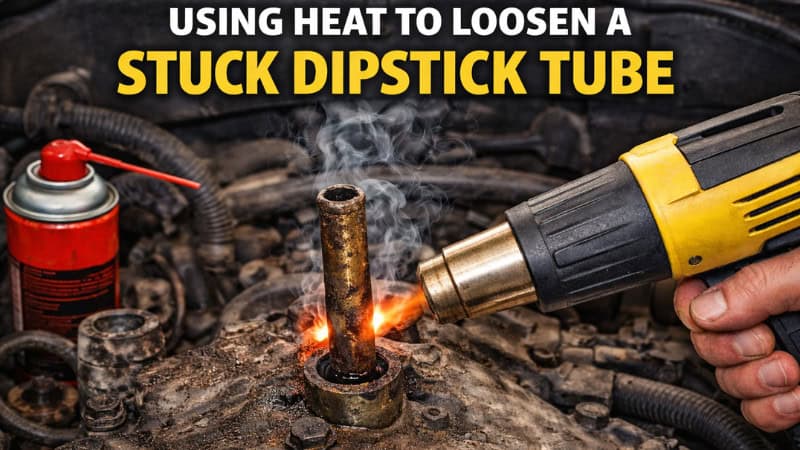
Using Heat to Loosen a Stuck Dipstick Tube
Use a heat gun or propane torch to heat the engine block near the tube’s base. Move the heat source constantly; don’t hold it in one spot. Focus on expanding the block, not the tube.
Heat for one to two minutes, then stop. Apply more penetrating oil as the metal cools. Resume gentle twisting with vise grips. Never pull the tube while it is hot.
Pulling the Dipstick Tube Out Safely
Once the dipstick tube begins to twist freely, it’s time to add upward movement—but slowly. While continuing to twist the tube, apply gentle upward pressure. This combination is far safer than pulling straight up, which can snap the tube at the base. Think of it as walking the tube out of the block rather than yanking it free.
If the tube resists, stop and reapply penetrating oil. Light taps upward with a rubber mallet on the vise grips can help break the remaining seal without deforming the tube. As the tube starts to rise, keep it straight. Angling it can damage the bore or bend the tube. Once removed, immediately stuff a clean rag into the dipstick hole to keep dirt or debris from falling into the engine.
You May also Like: Easiest Way to Remove a Stuck Oil Drain Plug
What to Do If the Dipstick Tube Breaks
Even with the right technique, a severely corroded oil dipstick tube can snap at the base. If that happens, don’t panic and don’t start prying blindly. The most important thing is to prevent metal fragments from falling into the engine. Stuff a clean rag into the opening immediately if you haven’t already.
If part of the tube is still visible, use needle-nose or locking pliers to twist it free, as you would a whole tube. For tubes broken flush with the block, a small internal pipe extractor can work well. Apply penetrating oil again and take your time. Avoid drilling unless absolutely necessary—one slip can damage the block. Once removed, thoroughly clean the bore before installing a new tube and O-ring.
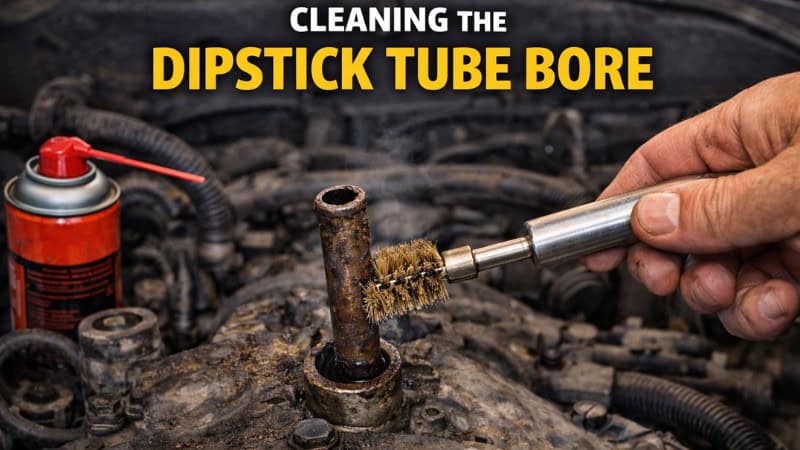
Cleaning the Dipstick Tube Bore
After the dipstick tube is out, cleaning the bore in the engine block is not optional—it’s critical. Any rust, old O-ring material, or sludge left behind can cause leaks or make the new tube difficult to install. Start by spraying brake cleaner directly into the bore, then wipe it out using a lint-free rag wrapped around a screwdriver or extension.
Take your time and feel for rough spots. Light surface corrosion is normal, but heavy pitting can prevent the new O-ring from sealing properly. Do not use sandpaper or anything abrasive that could scratch the bore. If rust is stubborn, a nylon brush works well without damaging the metal. Once clean, inspect the hole carefully. A smooth, clean bore ensures the replacement dipstick tube seats correctly and seals without future oil leaks.
Installing the Dipstick Tube Correctly
Installing the oil dipstick tube is straightforward, but doing it wrong can undo all your work. Always start by installing a new O-ring. Reusing the old one is a surefire way to cause a leak. Lightly coat the new O-ring with clean engine oil—this helps the tube slide in smoothly and prevents the seal from tearing.
Align the tube carefully with the bore and press it in straight. Do not hammer it in. If resistance is felt, pull it back out and realign. Once seated, reinstall the retaining bracket and tighten the bolt to factory spec—snug, not over-tightened. After installation, insert the dipstick fully and verify it moves freely. A properly installed tube should feel solid, sit flush, and show no signs of oil seepage once the engine is running.
Common Mistakes to Avoid
One of the biggest mistakes when removing a stuck oil dipstick tube is pulling too hard too soon. A straight upward force without twisting often snaps the tube at the base, turning a simple job into a headache. Another common error is crushing the tube with vise grips by clamping too tightly, which weakens the metal and makes removal harder.
Skipping penetrating oil—or not letting it soak long enough—is another problem seen in rushed repairs. Some people also overuse heat, damaging nearby wiring, seals, or plastic components. During installation, forcing the tube in at an angle or reusing the old O-ring leads to leaks and future removal issues. Taking your time and following proper steps prevents unnecessary engine damage and repeat repairs.
FAQ
FAQ 1: Can you remove a stuck oil dipstick tube without special tools?
Yes, in most cases, you can remove a stuck oil dipstick tube without specialty tools. Penetrating oil, locking pliers, and patience handle the majority of jobs. The key is twisting the tube gently before pulling upward. Many tubes break because people yank too early. Heat tools like a heat gun help with severe corrosion, but even then, this job is more about technique than expensive equipment.
FAQ 2: What causes an oil dipstick tube to get stuck in the engine block?
Oil dipstick tubes usually get stuck due to corrosion, heat cycles, and a hardened O-ring. Moisture collects at the base where the steel tube meets the block, especially on older engines or vehicles driven in snow states. Over time, rust and oil sludge act like glue. The rubber O-ring also bakes hard and bonds to the block, making removal difficult without proper prep.
FAQ 3: Should you pull or twist a stuck dipstick tube first?
You should always twist a stuck oil dipstick tube before pulling. Twisting breaks the rust and frees the O-ring from the block. Pulling straight up without twisting puts all the stress on the base of the tube, where it usually snaps. Even small side-to-side movement is enough to start loosening it. Once it twists freely, upward removal becomes much safer.
FAQ 4: Is it safe to use heat to remove a stuck oil dipstick tube?
Yes, using heat is safe if done correctly. Heat should be applied to the engine block around the tube, not directly on the tube itself. This allows the block to expand slightly and loosen its grip. A heat gun is safer than an open flame, but a small propane torch can work if you’re careful. Always keep heat away from wiring, hoses, and fuel lines.
FAQ 5: What should you do if the oil dipstick tube breaks off?
If the oil dipstick tube breaks, stop immediately and prevent debris from falling into the engine. If part of the tube is still exposed, locking pliers or needle-nose pliers usually work. If it breaks flush with the block, a small internal pipe extractor is the safest option. Avoid drilling unless absolutely necessary, as one slip can permanently damage the engine block.
FAQ 6: Can you drive with a loose or leaking dipstick tube?
No, driving with a loose or leaking oil dipstick tube is not recommended. A loose tube can allow oil to leak, air to enter the crankcase, and contaminants to get inside the engine. This can lead to oil pressure issues and long-term engine wear. If the tube moves by hand or shows oil seepage at the base, it should be reseated or replaced immediately.
FAQ 7: Should you reuse the old dipstick tube O-ring?
You should never reuse the old dipstick tube O-ring. Once removed, the O-ring is usually flattened, hardened, or cracked from heat exposure. Reusing it almost always results in an oil leak. New O-rings are inexpensive and easy to install. Lightly oil the new O-ring before installation to ensure smooth seating and proper sealing in the engine block.
FAQ 8: How long does it usually take to remove a stuck oil dipstick tube?
Most stuck oil dipstick tubes can be removed in 15 to 45 minutes if handled correctly. Severely corroded tubes may take longer due to soaking time with penetrating oil. The actual removal is usually quick once the tube starts twisting. Rushing the job often causes breakage, which adds hours. Taking your time upfront almost always saves time overall.
Final Thoughts
Removing a stuck oil dipstick tube is one of those jobs that rewards patience and proper technique. Most failures don’t happen because the tube is impossible to remove; they happen because it’s rushed. Twisting before pulling, allowing penetrating oil time to work, and using heat correctly are what separate a clean removal from a broken tube stuck in the block.
From a mechanic’s standpoint, this is a finesse job, not a strength test. When done correctly, the tube comes out without damage, the bore seals properly, and you avoid future oil leaks. Take the extra few minutes to prep and clean everything, and the repair will last. If at any point the tube won’t cooperate, stop and reassess—forcing it almost always makes things worse.
