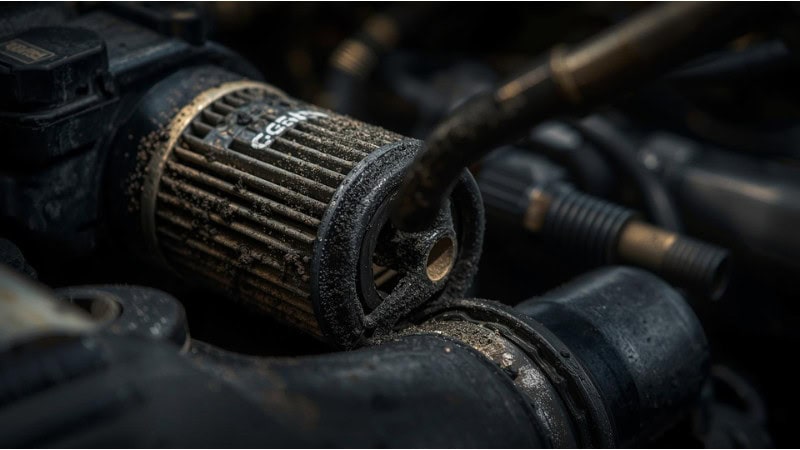
Removing a stuck oil filter can turn an easy oil change into a real headache. Even experienced mechanics deal with this—as filters age, their rubber gaskets can dry out and fuse to the engine, especially if overtightened. Heat, vibration, and old oil residue also contribute to a stubborn filter.
The good news? A stuck oil filter isn’t a disaster—and you don’t need special equipment to remove it. With a calm hand, the right approach, and a few basic tools, you can loosen it safely. This guide covers the steps mechanics use to solve simple cases.
Tools You’ll Need
Before you start wrestling with a stuck oil filter, it’s worth having the right gear on hand. A lot of frustration in the garage comes from using the wrong tool for the job, and oil filters are no exception. Different engines have different clearances, so the ideal tool can change based on the space you’re working in.
Most mechanics keep several types of filter wrenches for different scenarios. A cap-style wrench locks onto the end of the filter, creating a tight, socket-like fit for strong, direct turning. A band wrench has a flexible metal strap that encircles the filter, gripping it securely—ideal for tight or awkward engine spaces. A chain wrench uses a chain of metal to bite into the filter, gripping tighter as you apply force, which helps with extremely stubborn filters. Use penetrating oil to help loosen dry, fused gaskets by seeping into the seal. Wear gloves to protect your hands, and use shop rags to soak up oil and keep your grip dry.
If you’ve got these tools nearby, you’re set up for a smooth removal and less mess.
Step-by-Step Guide to Removing a Stuck Oil Filter
Now for the real work. The goal isn’t brute force—it’s working smart, so you break the seal without damaging threads, mounts, or your hands. Once a filter starts slipping or crushing, the job gets twice as annoying. These steps keep things under control and mess to a minimum.
Step 1: Check Your Workspace & Safety
Before you touch the filter, let the engine cool off. Hot engines make oil thin and messy—and heat can tighten the filter even more. Slide a drain pan underneath, wipe away any old oil so you can see what you’re doing, and make sure you have enough room to swing a wrench without bumping into anything else.
Step 2: Try the Hand-Twist Method First
Start simple. Grab the filter with a clean glove and try a steady counterclockwise twist. Don’t jerk it—slow, even pressure gives the gasket a chance to pop loose. Sometimes a filter feels stuck just because of leftover oil or dirt, and a clean grip is all you need.
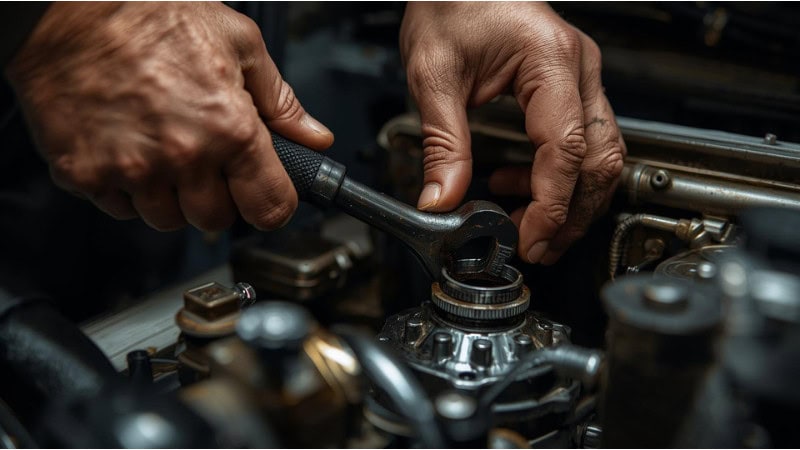
Step 3: Move to the Correct Oil Filter Wrench
If your grip isn’t enough, use the correct wrench: a cap-style for control, a band in tight spaces, or a chain for stubborn filters. Apply steady pressure—tighten the wrench, brace your hand, and turn firmly.
Step 4: Break the Seal with Penetrating Oil
Spray a little penetrating oil around the gasket and give it a few minutes to soak in. It helps loosen dried rubber and grime. After it sits, try again with your wrench. You’ll usually feel the filter crack loose as the seal breaks.
Step 5: Tighten Slightly Before Loosening
Here’s a classic shop trick: turn the filter just a tiny bit tighter before loosening it. That small movement can break the gasket’s grip, making removal much easier. It feels wrong, but it works more often than you’d think.
Step 6: Use a Strap Wrench or Breaker Bar if Needed
If you have enough space, a strap wrench or breaker bar gives you extra leverage without crushing the filter. This works best if the filter casing is still solid and hasn’t started to collapse.
Last-Resort Methods
If the filter still won’t move, don’t worry—every mechanic has been here. The next methods are more aggressive, but safe if you stay in control. The goal is to remove the filter without damaging the engine’s mounting surface.
Step 1: Punch-and-Twist Screwdriver Method
If the filter is crushed or the wrench keeps slipping, it’s time for the screwdriver trick. Carefully drive a long screwdriver through the center of the filter canister (all the way through both sides). Use the screwdriver as a lever and twist counterclockwise. This can cause oil to spill and may damage the filter casing, so work slowly and avoid slipping. If you slip or apply too much force, you could contact the mounting surface inside the engine, potentially leading to costly, hard-to-repair damage or leaks. Always check your alignment and never force the tool in a way that could harm the engine.
It will be messy, and the filter will deform more, but the leverage usually breaks it free. Take your time and avoid rocking too hard—steady twisting pressure is best.
Step 2: Removing the Entire Filter Mount
On older or neglected engines, filters can almost weld to the mount. If the gasket is fused or the filter base spins but won’t come off, the entire mount may need to be removed. Unbolting it exposes oil passages and risks leaks if done incorrectly.
This step is rare; let a shop handle it unless you’re confident with engine work. The mount houses delicate oil passages, so work with care. Without proper experience, you risk leaks or major engine damage.
Clean the Mounting Surface Properly
Once the filter is off, don’t skip cleanup—without it, leftover gasket material can cause leaks.
Start by wiping the mounting surface with a clean rag. Look closely—sometimes the old gasket sticks to the engine block, and if you don’t catch it, you’ll “double gasket” the next filter. That almost always causes an oil leak once the engine runs. If you spot a stuck gasket, gently peel it off with your fingers or a plastic scraper.
Next, clean the threads and sealing area so the new filter seats properly. A thin film of oil on the new filter’s rubber gasket is the old mechanic’s trick that prevents the filter from locking itself in place again. It also helps it glide on smoothly and seal evenly when you tighten it.
Everything you do here sets up the next oil change to go a whole lot smoother—literally.
How to Prevent a Stuck Oil Filter Next Time
Preventing a stuck filter in the future is much easier than removing one that is already seized. Most issues stem from overtightening or skipping simple prep steps; bad luck rarely plays a part—it usually comes down to installation.
The golden rule in any US garage is simple: never use a wrench to tighten a new filter. Once the rubber gasket touches the mounting surface, give it about three-quarters of a turn by hand—nothing more. The gasket does the sealing; extra muscle doesn’t help and only guarantees the next person (maybe you) gets a headache.
Always put a thin coat of clean oil on the gasket before spinning the filter on. That little bit of lubrication keeps the rubber from binding, tearing, or fusing to the block. It also ensures even seating, which makes removal smoother down the road.
Quality matters as well. Cheap filters can warp, collapse, or bake themselves onto the mount faster than name-brand ones. And staying on top of oil changes keeps sludge from building up and locking the filter in place.
Do these basics every time, and the next oil filter should come off as easily as it went on.
Common Questions
These are the questions people most often search for when dealing with a stubborn oil filter. Answering them directly helps your article rank better and gives readers the quick info they’re looking for.
Why do oil filters get stuck?
Oil filters usually get stuck because they were overtightened during the last oil change, the gasket dried out, or heat and vibration caused the rubber to bond to the engine block. Old oil residue can also act like glue over time.
Can I use WD-40 or penetrating oil to loosen an oil filter?
Yes, a light spray of penetrating oil around the gasket area can help break down dried rubber and grime. Give it a few minutes to soak before trying again. It won’t magically spin the filter off, but it makes the job a lot easier.
Should I ever tighten an oil filter with a wrench?
No. A wrench is for removal, not installation. Tightening with a wrench almost always leads to a stuck filter the next time you change the oil. Hand-tightening is more than enough once the gasket makes contact.
What if the filter crushes while I’m trying to remove it?
It happens all the time. A crushed filter just means you’ll need a stronger method—like a chain wrench or the screwdriver-through-the-filter trick. As long as you keep your force controlled and stay centered, you won’t damage the engine.
How much force is too much when removing an oil filter?
If you’re bending brackets, straining threads, or twisting the mount itself, that’s too much. You want steady, controlled pressure—not wild yanking. If the filter still won’t move, switch techniques instead of increasing force.
Conclusion
Removing a stuck oil filter can turn a quick oil change into a stubborn fight, but with the right approach, it’s nothing you can’t handle. Most of the battle comes down to working smart—cool engine, clean workspace, steady pressure, and the right wrench for the job. If the filter won’t move, the more aggressive methods will break it loose, as long as you stay in control and keep your focus on the mounting surface, not the housing.
Once you’ve got it off, cleaning the gasket area and properly prepping the new filter makes all the difference. A light coat of oil, a hand-tight finish, and a quality filter will keep the next oil change easy and frustration-free. These are the same habits mechanics use every day to avoid headaches down the road.
