If your hydraulic lift is slow, noisy, drifting down, or not moving, avoid random part replacement. Diagnose by identifying changes in fluid level, power supply, valve function, pump, or mechanical issues. Slow or noisy operation often means low or dirty oil; drifting usually points to worn seals and pressure loss. Air or dirty valves cause jerkiness, while insufficient power can stop the lift. Match symptoms and causes, and confirm with simple tests before adjusting. This process resolves issues faster, improves safety, and reduces the frequency of failures.
Safety First
Before starting any troubleshooting, make sure the lift is safe to work on—a hydraulic problem can let a lift drop suddenly. Clear the work area, take the vehicle off the lift if it’s unstable, and never get under a lift that isn’t resting on its mechanical safety locks. Hydraulic systems can lose pressure, but the locks are what keep you safe. If you need the lift up while testing, raise it, lower it onto the locks, and only then do your checks, following the manufacturer’s guidelines. Stay clear of pinch points near lift arms, carriages, and scissor mechanisms. Use wheel chocks as needed. If you spot cracked welds, bent posts, frayed cables, or broken lock parts, stop right away—those are serious safety issues and need repairs before any further work.
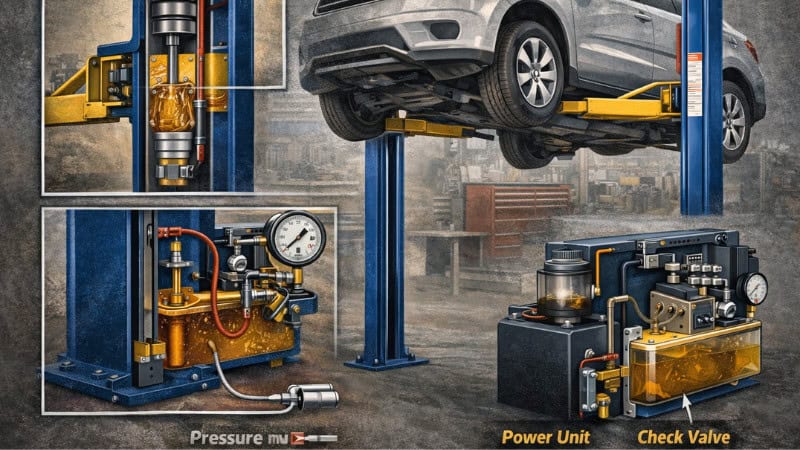
How a Hydraulic Lift Works
A hydraulic lift uses a motor-driven pump to pressurize oil in the cylinders, raising the vehicle. A check valve holds pressure up; a relief valve prevents overload. Lowering opens a valve to return oil to the reservoir. Cables and safety locks keep two-post lifts level, since hydraulics alone can’t.
Tools & Supplies You’ll Want Before You Start
You can troubleshoot most lift problems with basic shop tools, but having a few extras will make your job a lot easier and cleaner. Start with a good flashlight, some shop towels, absorbent pads, and a drip pan—leaks can be hard to spot until you clean the area. Make sure you have the right hydraulic oil (check the manufacturer’s specs) and a clean funnel to avoid accidentally introducing dirt into the system. A multimeter and a clamp meter help you check that the motor is getting the right voltage and not drawing too much current. A hydraulic pressure gauge kit with the correct fittings is a huge help in determining whether the issue is with the pump, valves, or cylinders. Keep some common o-rings and seals, plus thread sealant made for hydraulic systems—not regular plumbing tape.

Quick Triage: The 60-Second Checklist
Before taking anything apart, clearly identify the main symptom. For example, if the lift operates slowly, the likely causes are low oil or a weak motor; if the lift drifts down, the probable cause is pressure loss, often from internal leaks or faulty valves. If the lift fails to rise, operates slowly, drifts down, won’t lower, is noisy, rises unevenly, or trips breakers, match each symptom to a specific cause. This saves time. Next, look for visible issues: verify the oil reservoir level and check the floor and hoses for leaks. Inspect oil condition: foamy oil signals air, milky oil means water, and a burned smell hints at overheating. If the motor sounds strong but the pump whines, suspect low oil or a suction problem. Confirm power supply, ensure the emergency stop is released, and check for overload or mechanical obstruction, matching each issue with its likely cause.
you may like: How To Use a Car Lift
Hydraulic Lift Troubleshooting by Symptom
1. Lift Won’t Rise (Motor Runs or Hums)
If the motor runs or hums but the lift won’t rise, suspect hydraulic problems first: low fluid level, suction restriction, suction air leaks, an open relief valve, or a faulty check valve. Verify oil level (per OEM, typically lift fully down). Listen for cavitation—a gravelly pump sound. Check the suction hose and clamps, inspect the tank screen/filter. Use a pressure gauge; low pressure means pump wear or relief valve trouble. Solutions: refill, clean screen, fix suction leaks, service valves, or replace pump.
2. Lift Won’t Rise
If nothing happens when you press “up,” check controls first. Is the disconnect on, the breaker tripped, the fuse blown, or the E-stop pressed? Confirm correct voltage and examine for loose or burnt connections. A contactor might click but not pass power; bad pushbuttons or limit circuits block control. Check for tripped motor overload. Use a multimeter to check the voltage at the motor terminals when “up” is pressed. Fix root causes before swapping parts.
3. Lift Raises, but Is Slow
A slow lift usually signals low hydraulic flow or weak motor power. Check the electrical supply; low voltage reduces motor and pump output. Use a clamp meter to spot high current draw with poor performance. Next, check fluid—cold or wrong viscosity oil impedes movement. If the lift is slow and noisy, check for suction restrictions or aeration issues. Clogged filters or worn pumps reduce oil flow. If pressure is fine but speed is low, suspect flow-restricting issues. Solutions: fix the voltage, use proper oil, clean the filters, and test the pump.
4. Lift Goes Up but Drifts Down
If the lift drifts down after rising, you have a pressure leak. Check hoses, fittings, seals, and valves for leaks. If none, suspect check or lowering valve faults, or leaking cylinder seals. Dirty valves may pass oil. Fast drift under load means seal bypass. Solutions: service valves, rebuild seals. Don’t adjust the relief valve for drifting—it won’t help.
5. Lift Won’t Lower / Lowers Extremely Slow
If the lift won’t lower, start with the lock release and lowering valve. Some lifts require locks to disengage before lowering. Listen for release and inspect cables and pivots for issues. Solenoid valve lifts: check for coil power and function. A stuck lowering valve, due to dirt or varnish, blocks flow. Avoid forcing anything. Check the return hose for kinks. Solutions: adjust/repair lock release, clean or replace valve parts, and fix crushed hoses.
6. Oil Leaks
Most lift leaks originate from a few common areas, and the leak location often indicates the failing component. Hose ends and fittings may leak due to a loose flare, a damaged O-ring, or an over-tightened or cracked fitting. Valve block leaks typically appear as wetness around plugs or cartridges, often due to worn O-rings or contamination. Cylinder rod seal leaks appear as an oil film on the rod and as dripping down the cylinder, usually due to wear, rust, or side-loading. Reservoir leaks may result from a cracked tank or loose return fitting. Clean the area, operate the lift, and re-inspect to confirm the source. Use hydraulic-rated sealant only where specified, and do not apply tape indiscriminately. If excessive torque is required to stop a leak, the sealing surface is likely damaged.
Bleeding Air from a Hydraulic Lift
Air causes jerky movement, a spongy feel, a whining pump, and foamy oil. Most lifts self-bleed after several cycles when the oil level is set correctly, and there are no air leaks. Start with lift down, then top off. Use short up/down cycles. Air returns to the reservoir. If oil foams or looks milky, stop, let it settle, and check again. Persistent foaming points to suction leaks or poor return routing. Fix leaks before bleeding again.
you may like: 6 Best 4-Post Car Lifts Reviews – 2026
Hydraulic Fluid
Use the oil specified by the manufacturer—usually AW-32 or AW-46 in the US, but never guess. Wrong viscosity can slow, overheat, or damage lifts. Don’t mix oils or use ATF unless specified. Water makes oil milky, causes rust, and sticks valves; dirt and grit damage pumps and valves. Burnt-smelling, dark, foamy, or gritty oil means it’s time to clean the reservoir and replace the fluid. Clean oil ensures smoother, quieter, longer lift operation.
you may also like: 3 Common Types of Jacks for Automotive Use
Preventive Maintenance Checklist
Most lift failures are preventable if you treat the lift like production equipment, not a “set it and forget it” tool. Do quick daily looks: check for fresh leaks, listen for new noises, and make sure the safety locks engage clean and even. Weekly, wipe down the power unit, confirm the fluid level (lift down), and inspect hoses for cracks, rub marks, or swelling near the crimps. Monthly, inspect equalizer cables (2-post) for frays and proper tension, check pulleys/sheaves, and verify anchor bolts are tight to spec. Keep the lift lubricated where the manufacturer calls for it—dry sliders and binding arms cause overloads and electrical trips. Record changes in rise time and noise; a lift that suddenly slows or gets louder is telling you something before it fails.
Troubleshooting Flowchart
Begin troubleshooting by identifying the symptom and performing the simplest checks first. If the lift does not operate and the motor is silent, verify power, breakers or fuses, and the emergency stop, then check the contactor and motor voltage. If the motor runs but the lift does not move, inspect oil level, suction leaks, and clogged screens or filters, then use a pressure gauge to differentiate between pump and relief or check valve issues. For a slow lift, confirm voltage under load, oil viscosity and temperature, and filter restrictions, then test pump output. If the lift drifts down, check for external leaks; if none are found, suspect a faulty check or lowering valve, or a cylinder bypass. If the lift will not lower, confirm lock release operation, then check the lowering valve or solenoid power and return line restrictions. For a noisy pump, consider low oil, aeration, suction leaks, contaminated oil, or pump wear. Do not adjust relief settings until all basic checks are completed.
Common Mistakes
Avoid escalating minor lift issues by following proper procedures. Do not check or fill the reservoir with the lift raised, as this can lead to overfilling, oil spills, and system aeration when the lift is lowered. Do not mix fluids or use incorrect viscosity; improper oil can cause operational issues, especially in varying temperatures. Do not adjust the relief valve to increase lifting power, as this can overload the structure, overheat the oil, and damage the motor. Do not neglect cables, locks, or lubrication; many uneven lifting and overload problems are due to mechanical binding or cable misadjustment. Do not overtighten fittings to stop leaks; excessive torque often indicates a damaged sealing surface or o-ring. Always diagnose the issue before attempting repairs.
When to Call a Pro / Manufacturer Support
Certain lift problems require professional service and should not be addressed in-house, as improper repairs can create safety risks. If you discover cracked welds, bent columns, damaged arms, broken lock parts, or frayed equalizer cables, stop immediately; these are safety-critical issues. The same applies to repeated breaker trips after confirming correct voltage and wiring, which may indicate a motor or deeper electrical fault requiring expert diagnosis. Significant cylinder leaks, scored rods, or rapid drifting under load may necessitate a rebuild following OEM procedures and torque specifications. Contact the manufacturer support if the lift is under warranty or if you lack specification information, such as fluid type, relief pressure, or adjustment procedures. The priority is safety, compliance, and reliability.
FAQ
FAQ 1: Why does my hydraulic lift drift down overnight?
Slow drifting usually means pressure is bleeding off somewhere. First, check for external leaks at hoses, fittings, the valve block, and cylinder seals—clean the area and check again after cycling the lift. If it’s dry outside, suspect internal leakage: a check valve not sealing, a lowering valve that’s not fully seating, or cylinder seals bypassing internally. Drift that worsens with heavier loads often points to an internal bypass rather than a fluid-level issue.
FAQ 2: What hydraulic oil should I use in a car lift?
Use the lift manufacturer’s specified hydraulic fluid—don’t guess. Many US lifts use AW anti-wear hydraulic oil (often AW-32 or AW-46), but the correct choice depends on the brand, temperature range, and design. Wrong viscosity can cause slow lifting, noisy pumps, hot operation, and sticky valves. Avoid mixing oils and never use ATF unless the OEM specifically allows it. If you don’t know the spec, check the power unit label or manual.
FAQ 3: Why is my lift slow in cold weather?
Cold thickens hydraulic oil, so flow drops and the lift climbs slower—especially first thing in the morning. If the oil is too heavy for your climate, it’ll feel like the lift is dragging. Low voltage can make it worse, because the motor can’t spin the pump at full speed. Warm the oil with a few short cycles, then verify you’re using the correct viscosity per the OEM. Also, check the suction screen/filter for restrictions, which are more noticeable in cold oil.
FAQ 4: Why does my lift pump whine or growl?
A whining or growling pump is usually cavitation—meaning the pump is starving for oil. Common causes are low fluid level, a clogged suction screen/filter, or a suction-side air leak (cracked hose, loose clamp, bad fitting). Aerated oil can foam, worsening the sound. Check the oil level with the lift fully down, inspect the suction hose carefully, and clean the reservoir screen. If the noise stays after fixing supply issues, the pump may be worn.
FAQ 5: How do I know if it’s the pump or the cylinder?
A pressure gauge is the cleanest way to separate them. If the pump can’t build pressure to spec, suspect pump wear, a stuck-open relief valve, or a valve issue. If pressure is normal but the lift is weak/slow, or won’t hold, suspect an internal bypass—often due to cylinder seals or a valve that isn’t sealing. Another clue: if the lift raises fine but drifts down with no external leaks, cylinder/valve sealing becomes the top suspect. Test, don’t guess.
FAQ 6: Why won’t my lift lower?
Most “won’t lower” issues are lock-release or lowering-valve problems. If the mechanical locks aren’t releasing, the lift will hang even if the hydraulics are fine. Listen and watch the lock release action and check cable adjustment. If it’s a solenoid lowering valve, confirm the coil gets power when you press “down” and that the coil isn’t open. Dirt or varnish can also stick to the lowering valve spool. Check return hoses for kinks, too.
FAQ 7: Why does my lift raise unevenly?
Uneven lifting is often mechanical, not hydraulic—especially on 2-post lifts. Equalizer cables, pulleys, and lock engagement keep both carriages level. If cables are out of adjustment, stretched, or frayed, one side can lag or lead. Binding sliders, dry guides, or bent components can also make one side drag. Start by inspecting and measuring both sides at lock positions, then adjust cables to spec and lubricate the required points. Don’t ignore locks—uneven locks are a safety issue.
FAQ 8: How often should I change hydraulic oil in a lift?
Follow the manufacturer’s interval, but a good rule is to change oil sooner if it’s contaminated or the lift works hard every day. If the oil looks milky (water), foamy (air), dark/burnt (overheating/bypass), or gritty (dirt/metal), change it now—waiting damages pumps and valves. When you change oil, clean the reservoir and suction screen/filter, and refill with the correct fluid. Clean oil is cheaper than a pump or valve block.
Conclusion
Hydraulic lift troubleshooting gets a lot easier when you stop thinking “parts” and start thinking “symptoms.” Most issues come from the same core areas: oil level and condition, suction leaks, dirty valves, weak electrical supply, or mechanical binding and lock/cable problems. Start with safety, then do quick triage—look, listen, and verify the basics before you touch adjustments. Use simple tests to confirm what’s wrong, especially a pressure check whenever possible. Keep the system clean, use the correct fluid, and stay on top of inspections and lubrication. A lift that’s maintained and diagnosed the right way runs smoother, lasts longer, and keeps your bay safe. When you hit structural damage or repeated electrical faults, don’t gamble—get the manufacturer or a qualified lift tech involved.
